OpenID Connect (OIDC) Overview and Use Cases
What is OpenID Connect (OIDC)?
OpenID Connect (OIDC) is a modern user authentication protocol built on top of OAuth 2.0. It allows applications to verify a user’s identity without handling the user’s password directly.
Apps redirect users to a trusted Identity Provider (IdP) (e.g., Google, Microsoft, InstaSafe) to log in. The Identity Provider authenticates the user and then returns a signed ID Token containing identity information.
OIDC removes the responsibility of password storage and management from individual applications, letting them depend on trusted providers.
For users, OIDC enables Single Sign-On (SSO): after logging in once at the IdP, they can access multiple apps without logging in again.
Key Point:
OIDC is an open, standardized authentication protocol that answers “Who is this user?”, offloads password handling to specialized IdPs, and enables seamless SSO.
How OIDC Works: Key Components and Flow
Key Components
- User (End-User): The person trying to log in.
- Relying Party (Client/App): The application that needs authentication.
- Identity Provider (IdP / OpenID Provider): Authenticates the user and issues tokens.
- ID Token: A signed JWT containing identity claims (name, email, user ID).
- Access Token: Token used for authorization to access APIs.
- User Agent: Browser or app facilitating redirects and communication.
Provisioning with OIDC (Just-In-Time Provisioning)
With OIDC, an application can automatically create or update user accounts at login time. This is known as Just-In-Time (JIT) provisioning.
In simple terms, JIT provisioning means the app uses the data in the OIDC login (the user’s ID Token claims) to instantly set up the user’s account. Users are created and logged in on the spot — without any manual admin work.
How It Works
- A user logs in via an OIDC Identity Provider (IdP)
- The application receives the ID Token containing claims such as email, name, sub
- If the user doesn't exist, the application creates a new user automatically
- If the user exists, the application updates the account details (like name or email)
Example
A new employee clicks “Login with InstaSafe” for your SaaS app:
- They authenticate using their corporate IdP through OIDC
- Your app checks if the user exists
- If not, JIT instantly creates a new account with the details in the ID Token
- The user is logged in immediately — no pre-creation required
- On future logins, updated claims (e.g., changed name or email) are synced automatically
Without JIT
- First login fails unless an admin pre-created the account
- User onboarding is slow and manual
With JIT
- User accounts are created or updated automatically during login
- Users can access the app immediately
- Admin overhead is eliminated
Analogy
Think of JIT provisioning like a club that automatically issues you a membership card the first time you visit and show your ID.
Your corporate IdP is the “ID,” and the application's user account is the “membership card.”
Key Point
JIT provisioning = automatic user creation/update during OIDC login, ensuring instant onboarding and up-to-date user records.
Benefits of OIDC
OpenID Connect provides strong advantages in security, user experience, and operational simplicity.
1. Enhanced Security
- Applications don’t handle raw passwords
- ID Tokens are cryptographically signed by the IdP
- Authentication is performed by trusted identity providers
- Strong login policies (MFA, risk-based auth, passwordless) can be enforced by the IdP
- OIDC protects against common web attacks using:
- nonces
- secure token exchange
- standardized flows (Authorization Code + PKCE)
Centralizing authentication with expert IdPs “increases the security of the whole Internet.”
2. Better User Experience
- Enables true Single Sign-On (SSO)
- Users remember one set of credentials
- Reduces:
- Password fatigue
- Login friction
- Password reset tickets
- Faster login through familiar IdPs (Google, Microsoft, etc.)
- Works consistently across web, mobile, and desktop apps
Fewer login failures → better engagement and smoother UX.
Summary
OIDC strengthens overall identity management by offering:
-
Higher security
(no password storage, stronger authentication, signed tokens) -
Better user satisfaction
(single sign-on, quick logins, consistent multi-device experience) -
Simplified operations
(standardized protocols, built-in user provisioning)
It is a key technology for modern enterprise and consumer identity systems.
Key Takeaway
Using OIDC:
- Apps rely on trusted identity providers for authentication
- Users get seamless one-click SSO
- IT teams spend less time managing credentials and accounts
The result is safer logins, better UX, and more efficient IT management.
Single Sign-On (SSO) Integration Guide
InstaSafe Secure Access (IdP) ↔ Salesforce (SP/RP) via OpenID Connect (OIDC) with Provisioning
1. Overview
This document describes how to configure Single Sign-On (SSO) between InstaSafe Secure Access as the Identity Provider (IdP) and Salesforce as the Service Provider / Relying Party (SP/RP) using OpenID Connect (OIDC).
With this integration:
- Users authenticate once with InstaSafe using OIDC.
- Authenticated sessions are federated to Salesforce.
- User accounts in Salesforce are provisioned or updated automatically using a Salesforce Registration Handler.
Note:
OIDC is an identity layer built on OAuth 2.0. It provides secure authentication while delivering verified user identity claims (email, name, sub, etc.) to Salesforce.
2. Prerequisites
- Access to InstaSafe Secure Access Admin Portal
- Access to Salesforce Admin Portal
- Active Salesforce My Domain configuration
- Admin privileges on both systems
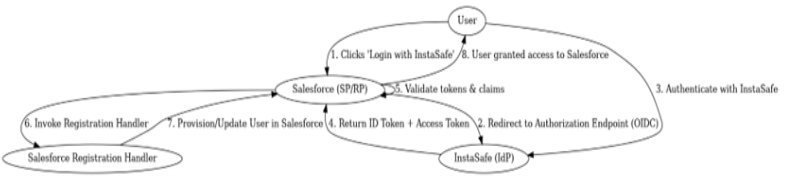
3. High-Level Flow (OIDC)
The OIDC SSO flow works as follows:
- User clicks “Login with InstaSafe” on Salesforce’s login page.
- Salesforce redirects the user to the InstaSafe Authorization Endpoint.
- The user authenticates using InstaSafe.
- InstaSafe returns an Authorization Code, which Salesforce exchanges for an ID Token and Access Token.
- Salesforce validates the tokens, maps the user, and grants access.
Notes:
- OIDC ensures the ID Token contains verified claims such as sub, email, name, etc.
- These claims are used by Salesforce for user matching & provisioning.
-
Use Authorization Code Flow with PKCE for maximum security (recommended for web/mobile apps).
4. Configuration Steps
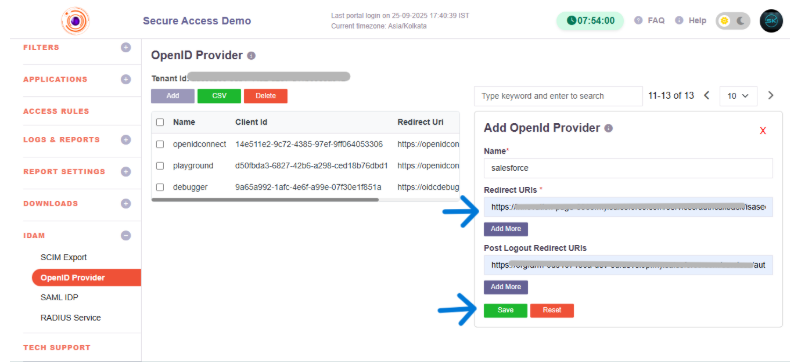
Step 1: Configure Application in InstaSafe (IdP)
- Log in to the InstaSafe Secure Access Admin Console.
- Navigate to IDAM → OpenID Provider → Add.
-
Configure basic application details:
- Application Name: Salesforce
- Redirect URI / Callback URL:
https://<your-salesforce-domain>/services/authcallback/<url-suffix>(This exact URL comes from the Salesforce Auth Provider created in Step 3.)
-
After saving, open the created OpenID profile and copy:
-
Client ID (App ID)
- Client Secret (App Secret)
-
OIDC Metadata URL:
https://<tenantName>.instasafe.com/.well-known/openid-configuration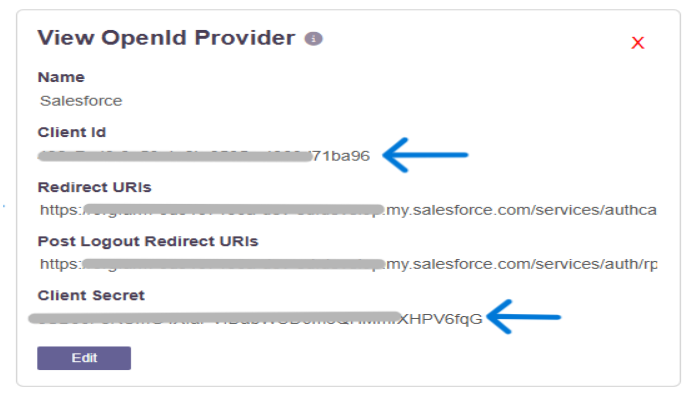
Important: Keep Client Secret secure.
Note
-
The Callback URL must match exactly between Salesforce and InstaSafe.
-
To regenerate the secret key, click Regenerate. The old secret will no longer work

Step 2: Create Registration Handler in Salesforce
- Go to Setup → Apex Classes → New.
- Paste the following code:
global class InstaSafeSSOHandler implements Auth.RegistrationHandler {

    global boolean canCreateUser(Auth.UserData data) {
        return true;
    }

    global User createUser(Id portalId, Auth.UserData data) {
        Profile p = [SELECT Id FROM Profile WHERE Name = 'Standard User' LIMIT 1];
        User u = new User(
            Username = data.email,
            Email = data.email,
            FirstName = (data.firstName != null && data.firstName != '') ? data.firstName : 'InstaSafe',
            LastName = (data.lastName != null && data.lastName != '') ? data.lastName : 'User',
            Alias = data.username != null ? data.username.left(8) : 'instasf',
            TimeZoneSidKey = 'Asia/Kolkata',
            LocaleSidKey = 'en_IN',
            EmailEncodingKey = 'UTF-8',
            LanguageLocaleKey = 'en_US',
            ProfileId = p.Id,
            FederationIdentifier = data.identifier
        );
        insert u;
        return u;
    }

    global void updateUser(Id userId, Id portalId, Auth.UserData data) {
        User u = [SELECT Id, Email, FirstName, LastName FROM User WHERE Id = :userId];
        u.Email = data.email;
        u.FirstName = (data.firstName != null && data.firstName != '') ? data.firstName : u.FirstName;
        u.LastName = (data.lastName != null && data.lastName != '') ? data.lastName : u.LastName;
        update u;
    }
}
Important
Ensure OIDC claims (sub, email, name) map correctly to Salesforce fields such as:
- Username
- FederationIdentifier
- FirstName / LastName
Step 3: Configure Auth Provider in Salesforce
- Go to Setup → Auth. Providers → New
- Choose OpenID Connect as the provider type.
- Fill in the following fields:
| Field | Value |
|---|---|
| Name | InstaSafe |
| URL Suffix | instasafe |
| Client ID | From InstaSafe |
| Client Secret | From InstaSafe |
| Authorize Endpoint URL | from InstaSafe metadata |
| Token Endpoint URL | from InstaSafe metadata |
| Scope | openid email profile |
| Registration Handler | InstaSafeSSOHandler |
| Execute Registration As | A dedicated admin user |
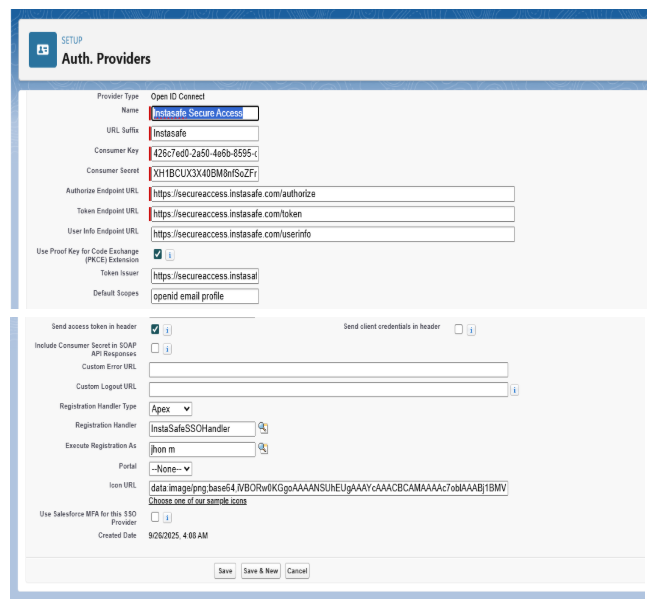
- Save the Auth Provider.
- Copy the Callback URL generated by Salesforce and paste it back into InstaSafe (Step 1).
Important
- The
openidscope is mandatory.
Without it, Salesforce will not receive an ID Token.
Step 4: Add InstaSafe to Salesforce Login Page
- Go to Setup → My Domain → Authentication Configuration.
-
Enable the checkbox for InstaSafe Secure Access.
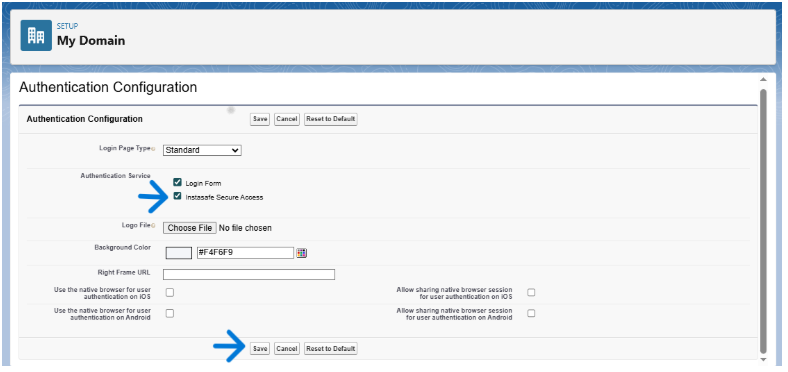
-
Save.
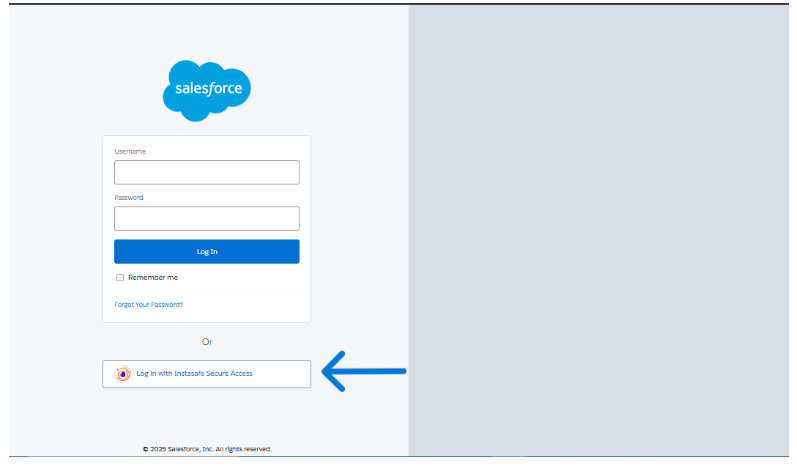
Users will now see a “Login with InstaSafe” button on the Salesforce login page.
When clicked:
- User is redirected to InstaSafe
- User authenticates
- Salesforce provisions or updates the user
- User is logged in seamlessly
Important
Always test with a non-admin user to validate user mapping and provisioning.