Configure ZTAA as a Identity Provider for SSO
Our(SSO) capabilities supporting a variety of authentication protocols which is pivotal to ensure seamless and secure user access across a wide range of applications, including federated environments. This multifaceted approach to SSO, encompassing SAML, OAuth, Azure AD, ADFS, and OpenID Connect, offers a comprehensive solution that caters to the diverse needs of organizations and their users.
Security Assertion Markup Language (SAML) is an XML-based open security standard framework for authentication and authorization across two different systems (Service Provider and an Identity Provider).
InstaSafe supports SAML 2.0 for integration with identity providers.
InstaSafe ZTAA can act as an Single Sign On solution for applications that support login via SAML. Supported Configuration
InstaSafe supports two kinds of SAML Configuration.

•Frontend SAML -> Backend Local

In this Case the ZTAA is directly used as an IDP to log into the
Application.

Application (SP)---> ZTAA(IDP)

•Frontend SAML - Back End SAML

In this scenario an organization already uses an IDP and wants to use ZTAA for
other features while still retaining a different primary IDP. In this case ZTAA
functions as a proxy acting as both an Identity provider for the application as
well as a service provider for the primary IDP. When any User tries logging in to
the application, request will first come to InstaSafe. InstaSafe will forward the
request to primary IDP.

The response received will be modified and forwarded to the application.


Application (SP) ---->ZTAA(IDP)  ||  ZTAA(SP)-----> APP(IDP)
Setting up ZTAA as an IDP
Terminologies
• Identity provider performs the authentication i.e., verifies the end user and establishes identity by confirming that the end users are who they say they are and sends that data to the service provider.
• Service Provider is the application that needs the authentication from the identity provider and uses the established identity to grant authorization to the user.
| Basic SAML Configuration setting | SP Initiated | IdP-Initiated | Description |
|---|---|---|---|
| Identifier (Entity ID) | Required for some apps | Required for some apps | Entity ID An entity ID is a globally unique name for a SAML entity, either an Identity Provider (IdP) or a Service Provider (SP). The first step in configuring any SAML deployment is to choose a permanent name for the entityThis field will Uniquely identify the application. ZTAA sends the identifier to the application as the Audience parameter of the SAML token. The Service Provider application is expected to validate it. This value also appears as the IDP Entity ID in ZTAA the application. |
| ACS URL (Reply URL/Redirection URL) | Required | Required | Assertion consumer service (ACS) endpoint is a location to which the SSO tokens are sent, according to partner requirements. ACS is applicable to all SAML versions and both the IdP- and SP-initiated SSO profiles. |
| Sign-on URL | Required | Need not be specified | When a user opens this URL, the service provider redirects to ZTAA to authenticate and sign on the user. Azure AD uses the URL to start the application from Microsoft 365 or Azure AD My Apps. When blank, Azure AD does an IdP-initiated sign-on when a user launches the application from Microsoft 365, Azure AD My Apps, or the Azure AD SSO URL. |
| IDP URL/SSO URL | Auto Generated | Required | The URL of the SAML IdP that handles sign-in requests and upon successful authentication issues the SAML token along with user details to the service provider. |
ZTAA(Identity Provider) Set up
- Login as Admin
- Go To Identity Management >> Identity Provider
- Click on Add and give name
- Select Generic SAML SP
- Click on next
- Now Click on Generate Certificate.
-
Fill in the details as
-
ACS URL and SP Entity ID will be obtained from the SP configuration page.
-
IDP Entity ID can be chosen by admin. However, it is recommended to use Tenant Domain name as IDP Entity ID
-
SP Certificate is not Mandatory.
-
Remaining fields automatically containing default values and will be modified depending upon Service Provider.
-
Enable toggle to Allow access from browser/desktop/mobile, as desired.
The documentation is to serve as a guide to be used while configuring ZTAA as an IDP.
While the general steps remain same , nomenclature of fields and configuration flow may
vary from application to application.
Configuring Freshdesk as a Service Provider
Settings IN ZTAA
-
Signed Assertion to be changed to true.
-
IDP entity to be defined and the same value is to pasted in Service provider.
-
ACS URL and SP entity ID to be obtained from Freshdesk and pasted here. Upon saving the configuration IDP URL and Logout URL will be generated.
Settings in Freshdesk
- Login into Freshdesk with admin credentials
- Go to SSO in security settings.
- Copy the ACS URL (SAML SSO URL) and paste it in respective field in ZTAA console.
- Copy IDP certificate from identity provider (generated in ZTAA) and paste it into respective field in Freshdesk.
- Change the Signing Option to "Signed Assertion only".
- The IDP URL generated in ZTAA is to be pasted in SSO URL.
- Click on Configure SSO to finish setup.
The above steps and the process of configuring ZTAA as a SSO for Freshdesk can be seen in the video below.

Configuring Zen Desk as a Service Provider
- Login into Zendesk with admin credentials
- Go to security setting >SSO
- Copy the ACS URL (SAML SSO URL) and paste it in respective field in ZTAA console.
- Copy IDP certificate from identity provider and paste into SAML one Login Tool>Calculate Fingerprint.
- Paste the obtained certificate fingerprint in ZenDesk Portal
- Click on save
- Go to Staff members>Enable External authentication and select Single sign on>click on save. Go to End Users > Enable External authentication and Click on save.
- The Service Provider URL will be generated. Copy the Same and Paste it in respective field in ZTAA console.
- Enable all toggle Allow access from browser/Allow access from desktop/Allow access from mobile
- Click on Next
- Select Backend Type Local
- Click on Submit.

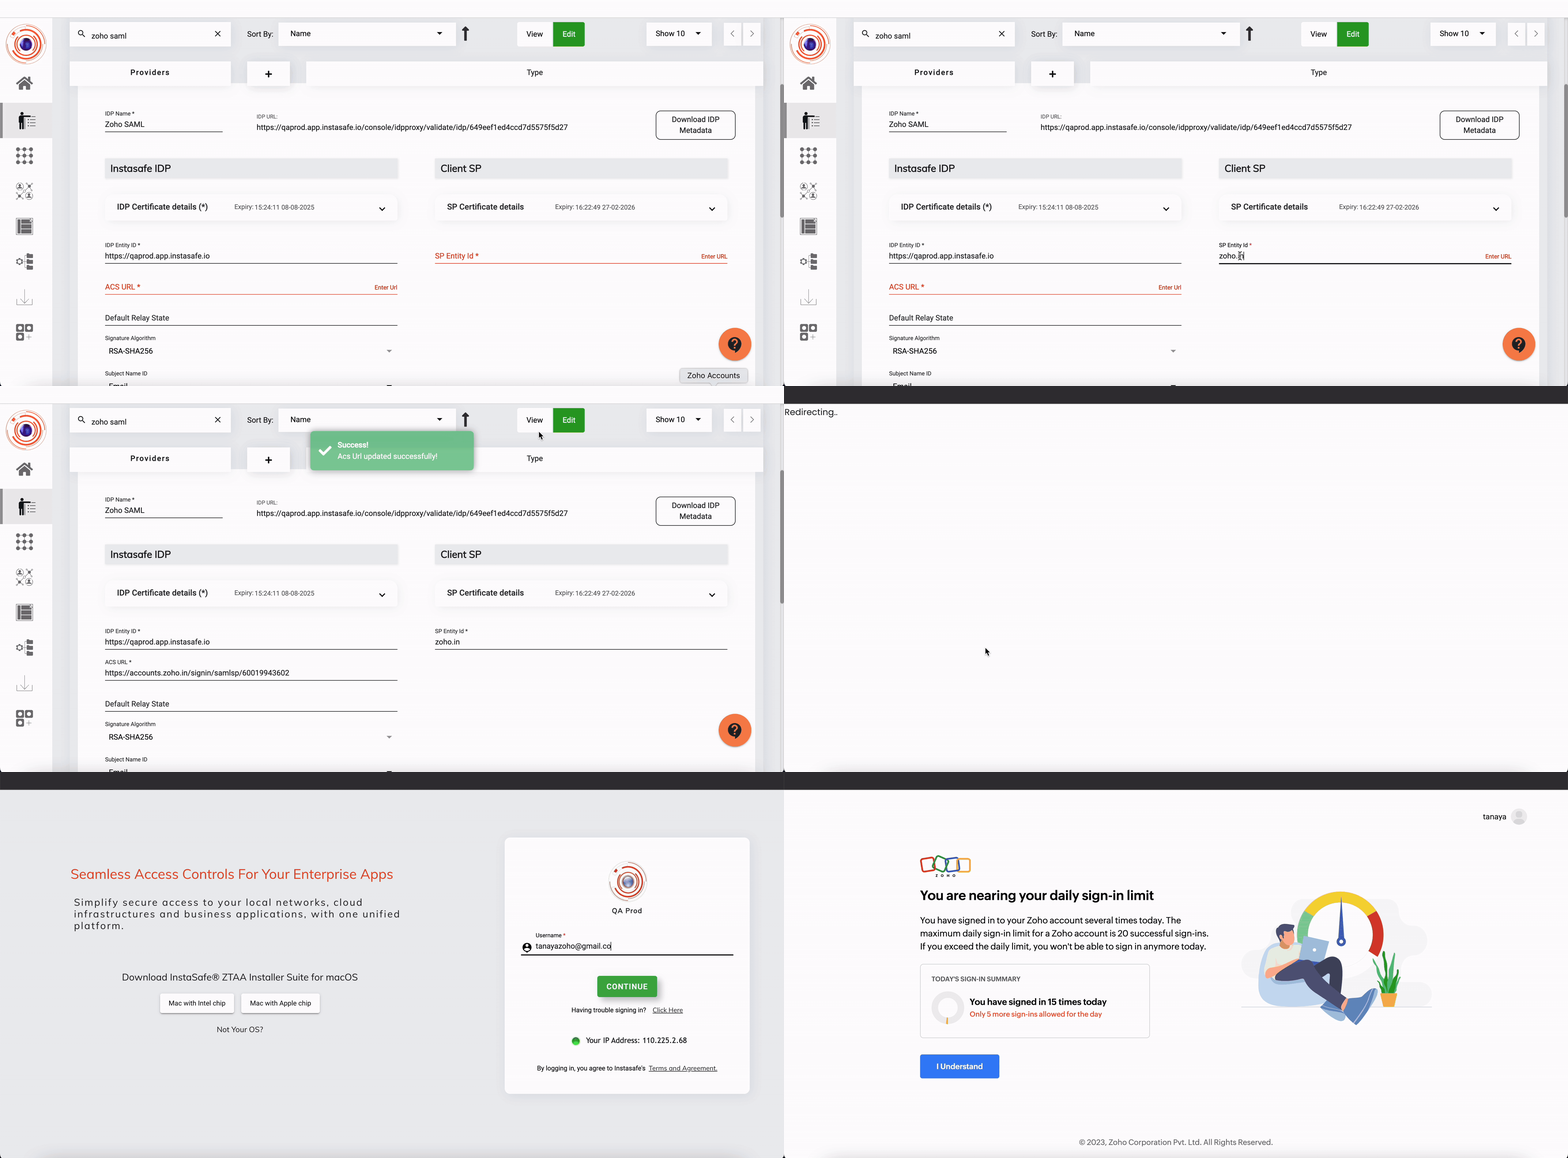
Configuring ZTAA as an Identity Provider to access Zoho
The below video illustrates the steps to configure ZTAA as an Identity Provider to access Zoho.
